


Wednesday, October 24, 2012
Ombre Dresser (Wordless Wednesday)
Just since I have had this blog in less than a year I have painted my dresser twice, so hello there, and here is the third time.. BUT I absolutely love it this time, if that makes any difference.

Monday, October 22, 2012
More Family Pictures!
I have always loved taking pictures and you can pretty much guess that I will always have my camera with me. I have desperately been dreaming of getting a Cannon Rebel and I think that maybe that will be be a birthday present to me in January or maybe a Christmas gift from my parents this Christmas. I think that it is time that I finally get one! I currently just have a point and shoot camera that is a Canon SD750 (This is the second one that I have had of this exact camera and I LOVE it so much!) But it works very well for a point and shoot! Since it is fall and of course Fall is my favorite season I had to incorporate the leaves and the trees into the pictures as well as some other rustic points, making sure to get a few that I consider to be a little more crisp.


So here they are some on my favorite pictures from Saturdays Photo Shoot!

This one is my absolute favorite! <333

The whole family Hand in Hand.

Kinley and Gaige are totally the best sidekicks ever!

Big Brother leading the way.

I love these girls to the Moon and Back..

Mom, with all of her children.

I hate saying that I really didn't like any of the ones of all of them together.. :( this was the best, but by this point everyone was pretty much over taking pictures!

Savanna I adore this little girl and this picture!

Kinley was refusing to cooperate, of course candy persuaded her!

Kaity was all about the pictures :) Very pretty!

I love this one of Loghen, he looks so grown and just like his dad!

The beautiful Taylor who of course go into my red lipstick for the pictures.

Little Man Gaige So serious!
There are a few more that I need to edit and upload, I took over 100 and got about 15-20 that I LOVED and there were others that I flat out hated how they turned out, I suppose that is always the case.
But I think that my lovely cousins look adorable!
Wednesday, October 17, 2012
Cheap, Easy Sentimental!
I had intended on doing a post yesterday but then I got busy and that didnt happen, so here is a quick post on an Easy How to for a Cheap but extremely sentimental gift!
The first thing I did was to get a block of wood 6 inches x 6 inches I printed out the lettering you see below. If you are curious as to how I created that letter it was really simple, I went onto Paint on a Windows Computer By selecting add text "A" then I clicked on the blank page and selected the size and placement of my Text Box, MAKE SURE YOU SELECT TRANSPARENT!! Then select your size and font. I changed up the sizes and font type for EACH NEW TEXT BOX! On the images below I had roughly 7 different text boxes I created to make them look the way they are.
AFTER you have all of your font placed you will need to reverse your image (you can find that here http://odds-an-endsdesign.blogspot.com/2012/10/picture-wood-transferwreath-project.html" on a previous post. To make them appear the correct way after the transfer.
(I painted my wood Blocks white beforehand)
After drying I applied the Gel medium
I then placed my image onto the paper and smoothed out all bubbles and let it dry over night. The process of this is listed in the above link!

There is the same process for the picture like you did with the font.

The Finished PRODUCT! I love them! So rustic and cute!
Voila! Very cheap and easy but so special!
Monday, October 15, 2012
Family
I am so lucky to have the best niece and nephews in the world! I was able to spend the entire day with them on Saturday because my sister had a training at work. I just wanted to share some pictures from our day :)


MY FAVORITE!

I love her pretty blue eyes!

Sibling Love!

She is such a diva!

She absolutely adores beng and older sister!
Just thought I would share the beautiful faces of Kaydon, Keylee and Kingston
Sunday, October 14, 2012
Upcycling Lamps
I am always in the mood to paint and make a mess, it is in my nature. So today I remembered a pair of lamps I bought at a yard sale around 6 years ago and it really isnt that they were in bad shape, it just was not something that I loved. The shades were this horrible red color and it really clashed, so I decided I would Upcycle it!
Here are the Pictures!
Here is the original lamp, see how HORRIBLE the lamp shade is!?! The lamp itself is not bad but I didnt love it, it has been stuffed back in the spare bedroom.
 I had to strip the fabric off of the lamp shade.
To do this I used a sewing tool that allows you to cut the stitching.


Here are the Pictures!
Here is the original lamp, see how HORRIBLE the lamp shade is!?! The lamp itself is not bad but I didnt love it, it has been stuffed back in the spare bedroom.

To do this I used a sewing tool that allows you to cut the stitching.


I then took the whole shade apart to apply new fabric to the shade.

Sadly I did not take pictures of this part, and this may seem to you to be one of the most confusing parts, but honestly it was very simple. I cut the fabric about a 1/2 of an inch big around the shade. I applied a thin layer of glue and laid the fabric on top and pulled it very tight to make sure it was smooth. I did the same to wrap it around to the other side and fold it over. The image below is the inside of the shade.

I had a bottle of spray paint left from the wreath project so I took my lamp outside and took it apart and spray painted the white metal. Notice that I got some spray paint onto the black part and the easy way that I got it off was with baby oil and a cotton ball and some elbow grease.

Here is the finished product of my lamp all put together!

LOVE!
BEFORE AND AFTER.

I also took the other lamp and I made it a dark plum. I didnt want them to match perfectly, so here are a couple of pictures about that process!


My finished lamps!
Wednesday, October 10, 2012
Sew what!?!
Its actually kind of funny that my mother is, Or maybe I should say WAS an expert seamstress for years.. For 25 years that was her job, and it seems strange that my sister and I never really picked up on this at all. I have never gone near a sewing machine, not for the lack of wanting to, more so because I was intimidated. I mean I had the not so succesful stint in sewing whilst in middle school where we had to pick out a pillow and sew it.. So in saying that I love crafts, really anything involved in crafts of any kind is totally up my ally, I decided that I wanted to sew. When my mom and step-dad got married in 2002 he bought her a really nice sewing machine that was literally used maybe 3 times before I started using it. I got it out and I have now made what I consider to be 3 fully successful projects and this is going to show them.
My first one came as an Idea that I pinned on pinterest and considering that it was my first real venture in sewing I am extremely proud!


I have a handful (or ten) that I really want to do and I have already spent a lot of money on fabric evem buying mainly sale items.. BUT This is the second project that I have finished and it is an apron for my niece.


My first one came as an Idea that I pinned on pinterest and considering that it was my first real venture in sewing I am extremely proud!

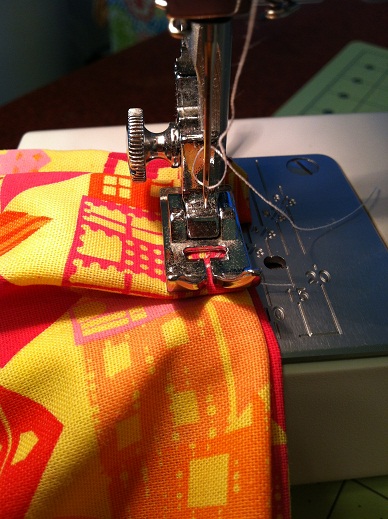
This is the first picture I took in the process, so I will do my best to explain..
I used about 6 yards of fabric total for my entire project.
I had 2 yards of light pink fabric.
I got various amounts in fabric of about 6 other patterns all having the pink in common.
I used my rotary cutter, and cut the backing 4inX4in.
and I cut my top fabrics in 5inX5in.
I pinned all 4 sides together.
Then pleated 3 sides with a pin, (Making the extra fabric fit tight onto the bottom fabric.)
I then would sew 3 of the sides together.
Then I would stuff it as full as I could with Polyfil.
Then sew the last side together.
That is how I have this basket above full of the sqaures.

If you are wondering why it is so long and skinny I made this, not to be used as a blanket but to be used a a Mattress for my nieces cot at daycare.
This means that it is 7X15 squares.
This was the MOST GRUELING part, sewing all of those little squares together.
Above the first thing that I did was lasy them out in the pattern that I wanted.

I got all of the 7 per line sewn together and then it was on the attacting the lines together to get my end product.

This was the end product with the fabric sewn on the back and everything.
(sorry about the crappy resolution)


And of course right before I started with the puffs I made her blanket and pillow for this.
and a quick tip that I have, I looked at the price of a travel size pillow and it was nearly $7.00 so I bought a large pillow for $2.50 and made 2 travel size pillows and it worked out great!
I was really glad that I found the pink zebra print fleece, and it was 40% off which made me even happier, and the backing on the blanket I bought for $2.50 a yard!
Anyways I spent around 35 hours on all of this, making the puff blanket and the blanket and the pillow.
I have a handful (or ten) that I really want to do and I have already spent a lot of money on fabric evem buying mainly sale items.. BUT This is the second project that I have finished and it is an apron for my niece.

I love this little apron and it is very very cute in person.

This is the back of the apron.

Up close of the ribbon and the top of the apron along with the pocket.

This is the pleated lower half of the apron with the double pockets.

I chose to attach the straps for around the waist and around the neck with velcro making it easier for my niece to put on by herself!

And as you have already seen here the the finished product!
And of course this the 3rd project that I have completed.
My first few pictures are serving to show you how I did my pleating.


As you can see pleating is actually really really easy using this method. You can also see the pocket I have sewn onto the apron.

The next thing that I did was sew on the band, excuse the uneven sewing on that Im not sure what happened lol..
But this is the apron with both pockets as well.

As I did with the other apron I used velcro to make it more child friendly.

This is how they are attached with the velcro.

An of course the final look of it all..
<3
I hope you had a great time reading this and maybe it inspired you with some ideas.. Im extremely proud of it all!
Subscribe to:
Posts (Atom)


